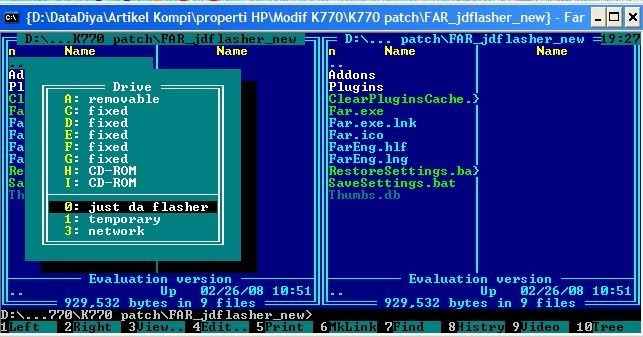
akan muncul seperti ini
| This image has been resized. Click this bar to view the full image. The original image is sized %1%2. |

2. tekan ALT+F1. nanti akan muncul beberap menu pilihan
| This image has been resized. Click this bar to view the full image. The original image is sized %1%2. |

3. pilih "just da flasher"
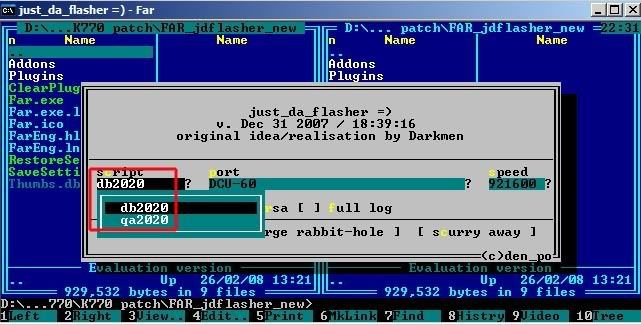
4. pilih tipe hp kamu di bagian script
| This image has been resized. Click this bar to view the full image. The original image is sized %1%2. |

5. lalu klik "jump down into the large rabbit-hole"
| This image has been resized. Click this bar to view the full image. The original image is sized %1%2. |

6. reinsert batre, lalu sambungkan ke kabel usb sambil tahan tombol C
7. klo berhasil tersambung, nanti muncul seperti ini
| This image has been resized. Click this bar to view the full image. The original image is sized %1%2. |

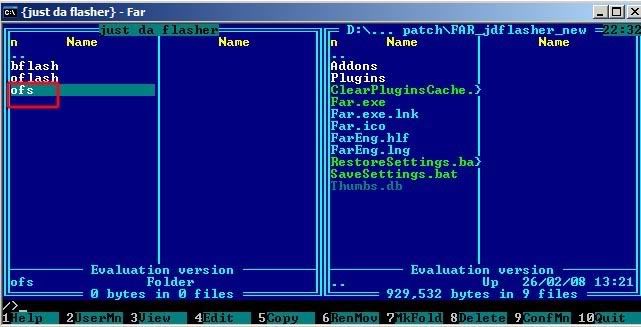
8. karena kita bertujuan buat flashing pilih atau klik "oflash" lalu pada bagian sebelah kanan cari file firmware yg akan diflash.
| This image has been resized. Click this bar to view the full image. The original image is sized %1%2. |

9. drag firmware dari jendela kanan ke jendela kiri, lalu akan tampil seperti ini :
| This image has been resized. Click this bar to view the full image. The original image is sized %1%2. |

10. lalu klik "copy" nanti akan muncul seperti ini :
| This image has been resized. Click this bar to view the full image. The original image is sized %1%2. |

11. selanjutnya klik “yeah flash it”
12 nanti akan muncul seperti ini
| This image has been resized. Click this bar to view the full image. The original image is sized %1%2. |

tunggu sampai proses flashing selesai.
13 setelah kita selesai flasing "MAIN" maka harus flashing pula "FS", carany sama s'perti langkah flashing "main" yang berbeda hanya pada file yang didrag diganti dengan file "FS"
seperti ini :
| This image has been resized. Click this bar to view the full image. The original image is sized %1%2. |

akhirnya kita telah berhasil melakukan flasing "MAIN" dan "FS tetapi masih ada langkah berikutnya yaitu upload cust pack
berikut ini cara upload cust pack:
1. lakukan langkah 1-7 pada flash firmware diatas
2. karena kita bertujuan untuk memasuki file system maka kita harus pilih "OFS"
| This image has been resized. Click this bar to view the full image. The original image is sized %1%2. |

3. lalu browse folder “/tpa/preset/custom” pada jendela sebelah kanan cari file cust pack yang akan diupload ke "FS"
| This image has been resized. Click this bar to view the full image. The original image is sized %1%2. |

4. lalu drag “Customize.xml” dari jendela kanan ke kiri
5. oke, upload cust pack telah selesai lalu klik "..." untuk keluar dari "fs"

Tidak ada komentar:
Posting Komentar
terima kasih yang telah ingin memberikan komentarnya...
kritik dan saran nya juga di tunggu lho...